

System Configuration
Logging in, creating users, changing passwords, and configuring network settings
Locating your SNAP
If configuring through a web browser, your PC will need to be connected to the same local area network as the SNAP. Use the WaveWare Discover and Reset Tool to connect to your SNAP and open the login page.
LOGGING IN
To get Started using a Web Browser or HDMI TV (with Mouse and Keyboard), you will need to Login to the SNAP. The SNAP is Password Protected with default login credentials.
SNAP default login credentials:
Username: admin
Password: password

Changing Passwords & Adding USers
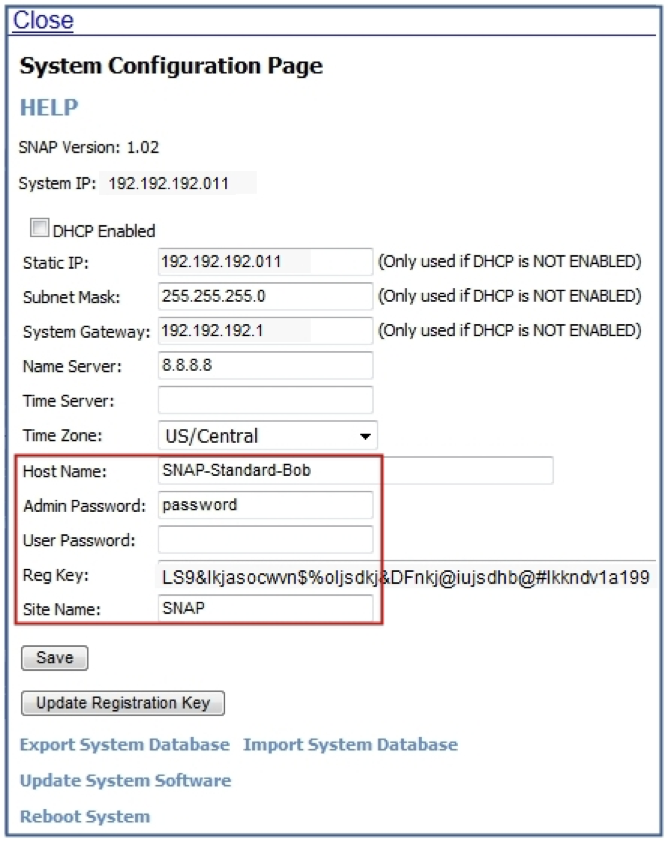
We will be working from the SNAP “Settings” Screen, the Button Located on the Far Left Side of the Main Menu as shown below within Screen Shot and Red Box.

The Settings Button takes you to View the “System Configuration Page” of the SNAP. This View offers you the “Host Name”, the “System” IP, the “Password” and “Site Name” Fields.
You can Change these Settings as Required, and within this Configuration you can also Enter a “User Password.” If you wish, you can also Add / Change the “Host Name” and “Site Name” or Leave the Defaults.
network configuration
The DHCP Setting is the way the SNAP Ships as Default, allowing it to be Found on the Network, just as soon as the SNAP is Connected to the Network, Provided the Network allows for DHCP Devices to be used. DHCP means that the “Network” will automatically Assign an IP Address to the SNAP as soon as it is Detected on the Network.
If the Network doesn’t allow for DHCP Devices, meaning it does NOT Assign IP Addresses Automatically when the Device is attached to the Network, then you would have to use a HDMI TV or Monitor to Gain Access to the SNAP instead of the Ethernet Connection so as to be able to Manually Assign the Static IP Address to the SNAP.

Before the SNAP can Receive any Manual Updates, then the SNAP would be Required to have access to the Internet in order to Reach our Server for the Update File.
You would also need the “Name Server” IP Address Entered into that Field. If you do not know what that is, you can use the “Name Server” Shown in the Example above.