

SNAP Simulator Tool
Testing basic input and output from SNAP using the built-in simulator
This Portion of the Guide will Demonstrate How to use the Simulation Tool of the SNAP Configuration. When you have the Basics of the Configuration Completed, you have the ability to Test the Basic Input and Output. This Guide offers you a Complete Overview of Exactly How the SNAP Simulator works.
Getting Started
In this Example, we will Test the TAP Input Block with the TAP Output Block. To Get Started... Click on the “Input Protocols” Text From the List of Inputs the Protocols, Choose the Input Simulator which will be used for Testing the Basic Config.

Take the Input Simulator Block and Place it on the Top of the Input you want to Test.
In this Example, since we wish to Test the TAP Input, we place it on Top of the TAP Input Block, where it will “SNAP” into Place as shown below.
Notice the Yellow Outline Border of the Simulator Block, as the Bottom is Placed onto the Notch at the Top of the Tap Input Block...and it will “Snap” into Place and become part of the Configuration.

Next you will need to Configure How you want to use the Simulator.
You can Choose a Name for the Simulator (Not really necessary, the Default works Fine).
Enter a Test Message to be used when Sending the Test Alerts (The Blue Box).
You can Choose the Destination, the Repeat / Increment and Max Age for the Test Alerts Sent (Green box), Or you can leave Everything set to the Defaults as Shown Below.
It is suggested that you at least Enter a Max Alert Age of about “10 Seconds” so that the Alerts will be Removed when the Tests involve using the Alerts Lists Viewer.
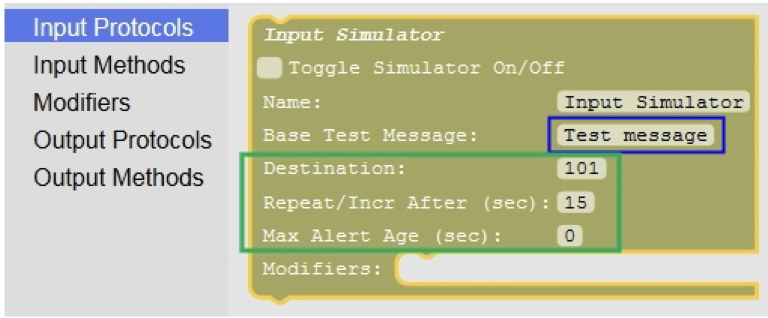
The Base Test Message: Enter any Test Message to be used for the Simulated Tests
The Destination: Enter the ID of the Device to be used for these Tests. Example would be for Pocket Pagers, so you would use a Pager ID within the Pager Database of the Paging Encoder.
The Repeat / Increments After (in Seconds): This tells the Simulator that you want to Send another Test Alert Message after a Pre-Set Amount of Time. The Default is 15 Seconds. So for this Simulation, Every 15 Seconds the Same Message is Sent again and again as long as the Simulator is Running. Note that each New Alert Message will also have a Numeric Value Incremented onto the End of the Message. For Example: Test Message 1, Test Message 2 and etc.
The Max Alert: This tells the Simulator How long to leave the Test Message Active before Sending a Cancel Message. Leaving it Set to Zero will tell the Simulator not to Remove / Cancel any Alert Messages, so they stay in Active state. Setting it to a Numeric Value between 1 and 999 Seconds will tell it when to Cancel / Remove the Message. For Example if used with an Alerts List Viewer, setting this Value to 10 would mean that in 10 Seconds, Cancel the Test Message and it would be Removed from the Active Alerts List.
Starting/ending the input simulator
To Toggle “On” Simulator, as shown in the Red Box, Place a Check Mark into the Check Box to Start the Simulation. The Test will Immediately Start.
With this Configuration... The Simulator will Send the “Test Message” out to the Destination Pager ID of “101” and will then “Repeat” the Message every “15 Seconds” and “Never” Cancel the Alert Message.
It is suggested that you at least Enter a Max Alert Age of about “10 Seconds” so that the Alerts will be Removed.
To Stop the Testing Simulation, Simply “Uncheck” the “Toggle Simulator On/Off” Check Box.

This Test should have allowed the Test Pager to Receive the Alert “Test Message” and have also shown a Numeric Value after each Received Message and would Test the TAP Input thru the SNAP and the TAP Output with the End Result of having the Messages show up on the Pocket Pager.
If this Test worked, then your Configuration should be working as Expected, however if No Messages were received, you would then need to Look over the Entire Configuration to try and Understand what did not work and make Corrections and then Re-Test the System Config again.
Generally it is only a Connection Problem, meaning Possibly a Wrong USB Port or Ethernet IP Address, IP Port Number Mismatch, etc. But sometimes it also could be a Bad Pager ID, by not being Listed in the Pager Database. But whatever the Problem, once Found and Corrected, you can Re-Test until you have Successful Tests.
Once you are Satisfied with the Simulator Testing, you would Click and Hold the Block immediately under the Simulator Block (In this Example, the TAP Input Block) and then Drag it to Un-Dock it from the TAP Output Block, and then Move it to the Trash Can in order to Remove it from the Config Screen.